
Good day my fellow readers. As promised to some of my friends – today, I’m blogging about my personal experience and troubleshooting tips on how to get your machines geared up for the Windows 10 upgrade.
This can be quite a long winded article so, I’ll segment them into how to upgrade immediately, and what to expect or troubleshoot after that (most machines bought from 2015 onwards should not have any issues but just in case you are stucked with the problems I’ve faced in some of my machines then, this article will be another life saver for you).
Can’t Wait ? How to upgrade NOW?
Good question, we all get the GWX app which is the tiny notification icon saying you should reserve a copy of windows blah blah. It located at the corner of the taskbar right? And then there’s waiting and lots of waiting.

GWX Popup
Note: There are numerous ways of getting the update fast, some may lead to getting wrong editions or preview versions of windows 10 (e.g. cmd command with the update screen on etc) and some might make things worst.
Below are the steps I took for upgrade.
1. Register and reserve your copy. Using the GWX icon that appears weeks before July 29th 2015

GWX (Get Windows 10) Icon
2. Head to Microsoft official Windows 10 tool download page. Click here!
Choose the version (32bit / 64bit that fits your current windows), the tool will detect which Windows Edition you are in. Mine was 64bit home edition of Windows 8.1, so I’ll just get the 64 bit one that.
For OEM laptop users, make sure you consult your manufacturer for the model drivers ready for Windows 10. Have them downloaded into a folder in desktop.
Media Creation Tool
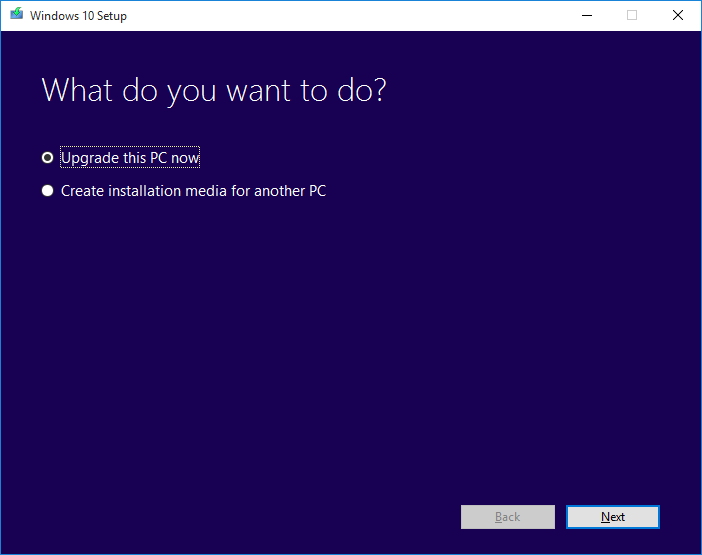
3. Proceed with installing with the Media Creation Tool
Select Upgrade this PC, and the process of installation will start. If you encounter no problem during this process, keep waiting and continue with the upgrade. For those having issue, read below.
Note: There’s a setback in this Media Creation Tool itself. This interim tool is only setup for US Region language ONLY. For those, using Single Language edition or Region which are not set as US as default; may face the “Something Happened” error message which is a bummer. One of my lappy faces that issue. No worry, you can fix this easily.
The following link have the solution for this. Here. Doing so, should get you straight to finishing the upgrade.
What Next? Driver Incompatibility / Software Settings Issues !
While most games (steam latest games, elite dangerous and blizzard games will worked no worries), printers, display, audio will worked out of the box – there are some teething problems to attend to.
Take Note : Windows 10 will automatically, remove all incompatible software hijacking the start menu aka classic shell and pokki will be wiped off. Most rootkit protection based antivirus will not work, e.g. Kaspersky 2015, you will need an update from them soon.
Next, I’ll write about issues I have for my VMWare Pro Player 7 and my infamous ASUS USB-N53, the infamous ASUS dual band USB adapter; that ASUS themselves never bothered to update drivers to.
Upon updating to Windows 10, I noticed again my USB-N53 driver is been replaced with a MediaTek Chipset driver. The adapter is working normally as a 2.4Ghz wifi Adapter, but I lost all my 5Ghz signal. Now, this problem happened before, previously during my 8.1 update.
To fix this, the treatment is almost the same. First we enable back the handy legacy driver installation mode. This mode allows users to override and manually install drivers replacing the current ones.
Since, we are using Windows 10, this option is accessible under Start Menu > Settings > Update & Security > Recovery > Advance Startup > Restart Now.
Doing so, will restart the computer to a special screen like below. Choose Startup Settings, and then Disable Driver Signature Enforcement.
StartUp Settings

Restart and choose, Disable driver signature enforcement.
Once you do so, once the Windows 10 starts, you can then install back the drivers, under Network settings > Change Adapter Option > Right Click the Wifi Adapter by ASUS N-53 > Properties > Configure… > Driver Tab > Update Driver with the ones provided by ASUS (the RALink chipset). Once you do so, double check to see if the Wifi adapter is replaced to RALink – sometimes, you may have driver variant installed.
If it’s still not working, repeat the same steps to get to Update Driver, then from there select, Browse my computer for driver software > Let me pick from a list of device drivers on my computer. Choose the ones with RALink. For me it was the third one (see screen).

Choose RALink, the lowest one.
Issues with VMWare Player Pro 7. Guest OS network won’t work.
Fortunately, this is a very common problem for all VMWare users every time there’s a changes in main network device / OS major update.
Easiest fix for this, get the installer for VMWare same version with the ones you are using. Execute the installer, and select Repair instead of Install. It will repair all the problems in VMWare. After patching the software, we also need to patch our Guest VMX files which previously setup to interact with the previous settings.
If you start the vmware guest os of any kind you will encounter a popup error says, “You have an incorrect version of driver – vmci.sys” and you can no longer start your VM. Solution is simple, locate the place where your vmx files are stored, and choose to edit it with some notepad or any text editor of yours. Search for the line saying..
vmci0.present = “TRUE”
What you need is to modify the TRUE statement into FALSE. Save the file and restart the VM. VMWare will then redetect the new settings and everything will boot up again.